在 Google Kubernetes Engine (GKE) 上部署 cert-manager 並使用 Let's Encrypt 為 Ingress 建立 SSL 憑證
上次驗證:2022 年 7 月 15 日
在本教學中,您將學習如何在 Google Kubernetes Engine (GKE) 上部署和設定 cert-manager。您將學習如何設定 cert-manager,以便使用 HTTP-01 挑戰,從 Let's Encrypt 取得已簽署的 SSL 憑證。最後,您將學習如何使用該憑證來提供具有公開網域名稱的 HTTPS 網站。
Google Cloud:Google 提供的一套雲端運算服務。
Kubernetes:在您的伺服器上執行。自動化容器化應用程式的部署、擴展和管理。
cert-manager:在 Kubernetes 中執行。取得 TLS / SSL 憑證,並確保憑證有效且為最新狀態。
Let’s Encrypt:一種網際網路服務。讓您產生免費的短期 SSL 憑證。
首先,您將建立一個 Kubernetes (GKE) 叢集,並部署一個範例網頁伺服器。然後,您將為您的網站建立一個公開 IP 位址和一個公開網域名稱。您將設定 Ingress 和 Google Cloud 負載平衡器,以便網際網路用戶可以使用 HTTP 連接到網頁伺服器。最後,您將使用 cert-manager 從 Let's Encrypt 取得 SSL 憑證,並設定負載平衡器以使用該憑證。在本教學結束時,您將能夠使用 https:// URL 從網際網路連線到您的網站。
先決條件
💻 Google Cloud 帳戶
您將需要一個 Google Cloud 帳戶。註冊需要信用卡或銀行帳戶詳細資訊。請造訪Google Cloud 入門頁面,並按照指示操作。
💵 如果您之前從未使用過 Google Cloud,您可能有資格參加Google Cloud 免費方案,該方案提供 90 天的試用期,其中包括 300 美元的免費 Cloud Billing 額度,以探索和評估 Google Cloud。
💻 網域名稱
您將需要一個網域名稱,並且能夠在該網域中建立 DNS 記錄。我們將從 Google Domains 取得一個 12 美元的網域名稱。Google Domains 是許多可能的「網域名稱註冊商」之一。NameCheap 和 GoDaddy 是另外兩個知名的註冊商。
💵 如果您不想要購買網域名稱,也可以調整本教學課程,使用 IP 位址來提供您的網站和 SSL 憑證。
💻 軟體
您還需要在您的筆記型電腦上安裝以下軟體
- gcloud:一組用於建立和管理 Google Cloud 資源的工具。
- kubectl:Kubernetes 命令列工具,可讓您設定 Kubernetes 叢集。
- curl:一個命令列工具,用於使用 HTTP 和 HTTPS 連接到網頁伺服器。
ℹ️ 請嘗試執行
gcloud components install kubectl以快速安裝kubectl。
0. 使用 Google Cloud 專案設定 gcloud
如果您沒有 Google Cloud 帳戶,以下命令會為您建立一個帳戶
gcloud init
您需要對以下問題回答「yes」
Do you want to configure a default Compute Region and Zone? (Y/n)? Y
執行命令後,您將看到專案名稱、預設區域和預設時區。
範例輸出
* Commands that require authentication will use firstname.lastname@example.com by default* Commands will reference project `your-project` by default* Compute Engine commands will use region `europe-west1` by default* Compute Engine commands will use zone `europe-west1-b` by default
在本教學中,我們將在執行 gcloud init 時選取的專案名稱稱為 PROJECT 變數。每當您在命令中看到 $PROJECT 時,您需要 (1) 在執行命令之前手動取代變數,或者 (2) 在您的 shell 工作階段中匯出變數。這適用於您在本教學中列出的命令中將遇到的所有環境變數。
我們將採用選項 (2),因此我們需要在繼續操作之前,使用 gcloud init 列印的資訊來匯出環境變數
export PROJECT=your-project # Your Google Cloud project ID.export REGION=europe-west1 # Your Google Cloud region.
1. 建立 Kubernetes 叢集
首先,讓我們在 Google Cloud 中建立一個 Kubernetes 叢集。您將需要為您的叢集選擇一個名稱。在這裡,我們將選擇「test-cluster-1」。讓我們將其儲存在環境變數中
export CLUSTER=test-cluster-1
現在,使用以下命令建立叢集
gcloud container clusters create $CLUSTER --preemptible --num-nodes=1
設定 kubectl 的 Google Kubernetes Engine 驗證外掛程式
gcloud components install gke-gcloud-auth-pluginexport USE_GKE_GCLOUD_AUTH_PLUGIN=Truegcloud container clusters get-credentials $CLUSTER
現在檢查您是否可以連線到叢集
kubectl get nodes -o wide
⏲ 建立叢集需要 4-5 分鐘。
💵 為了將您的雲端費用降至最低,此命令會使用可搶佔的虛擬機器建立一個單節點叢集,這比一般的虛擬機器便宜。
2. 部署範例網頁伺服器
我們將部署一個非常簡單的網頁伺服器,該伺服器會以「hello world!」回應 HTTP 請求。
kubectl create deployment web --image=gcr.io/google-samples/hello-app:1.0
我們還需要建立一個 Kubernetes Service,以便將連線路由到網頁伺服器 Pod
kubectl expose deployment web --port=8080
ℹ️ 這些kubectl 命令式命令用於提高可讀性和簡潔性。您可以隨意使用 YAML 清單和
kubectl apply -f來代替。ℹ️
kubectl expose建立的 Service 將為ClusterIP類型 (預設值),這只有叢集內的元件才能連線到。稍後我們將建立一個 Ingress,這是我們讓叢集外的用戶可以使用服務的方式。🔰 閱讀更多有關使用 Service 來公開您的應用程式。
3. 建立靜態外部 IP 位址
本教學是關於使用 HTTP01 挑戰機制建立具有 Let's Encrypt SSL 憑證的公開 HTTPS 網站,因此我們需要一個公開 IP 位址,以便 Let's Encrypt 和其他網際網路用戶都可以連線到您的網站。
在 Google Cloud 中建立公開 IP 位址很容易,稍後我們將其與您的網站網域名稱和 Google Cloud 負載平衡器建立關聯,該負載平衡器將接受來自網際網路用戶的 HTTP(S) 連線,並將請求代理到您叢集中執行的網頁伺服器。
如下所示建立全域靜態 IP 位址
gcloud compute addresses create web-ip --global
您應該會看到列出的新 IP 位址
gcloud compute addresses list
⚠️ 您必須建立一個
globalIP 位址,因為這是我們將在本教學中使用的外部 HTTP(S) 負載平衡器的先決條件。💵 全域靜態 IP 位址僅在 Premium 網路服務層級中提供,而且比臨時和標準公開 IP 位址貴。
🔰 閱讀更多有關Google Cloud 中的網路服務層級。
🔰 閱讀更多有關在 Google Cloud 中保留靜態外部 IP 位址。
最後,我們將 IP 位址儲存到環境變數中,以供稍後使用。使用以下命令顯示 IP 位址
gcloud compute addresses describe web-ip --format='value(address)' --global
然後,複製輸出並將其儲存到環境變數中
export IP_ADDRESS=198.51.100.1 # Replace with your IP address
4. 為您的網站建立網域名稱
您的網站需要一個網域名稱,而 Let's Encrypt 會在簽署您的 SSL 憑證之前檢查您的網域,因此網域名稱需要可從網際網路存取。
我們將使用信用卡購買一個便宜的網域名稱。前往 https://domains.google.com,並在搜尋方塊中輸入內容。例如,我們搜尋了 hello-app.com,因為我們要部署的範例容器稱為 hello-app。最重要的是,我們要確保按價格排序網域名稱
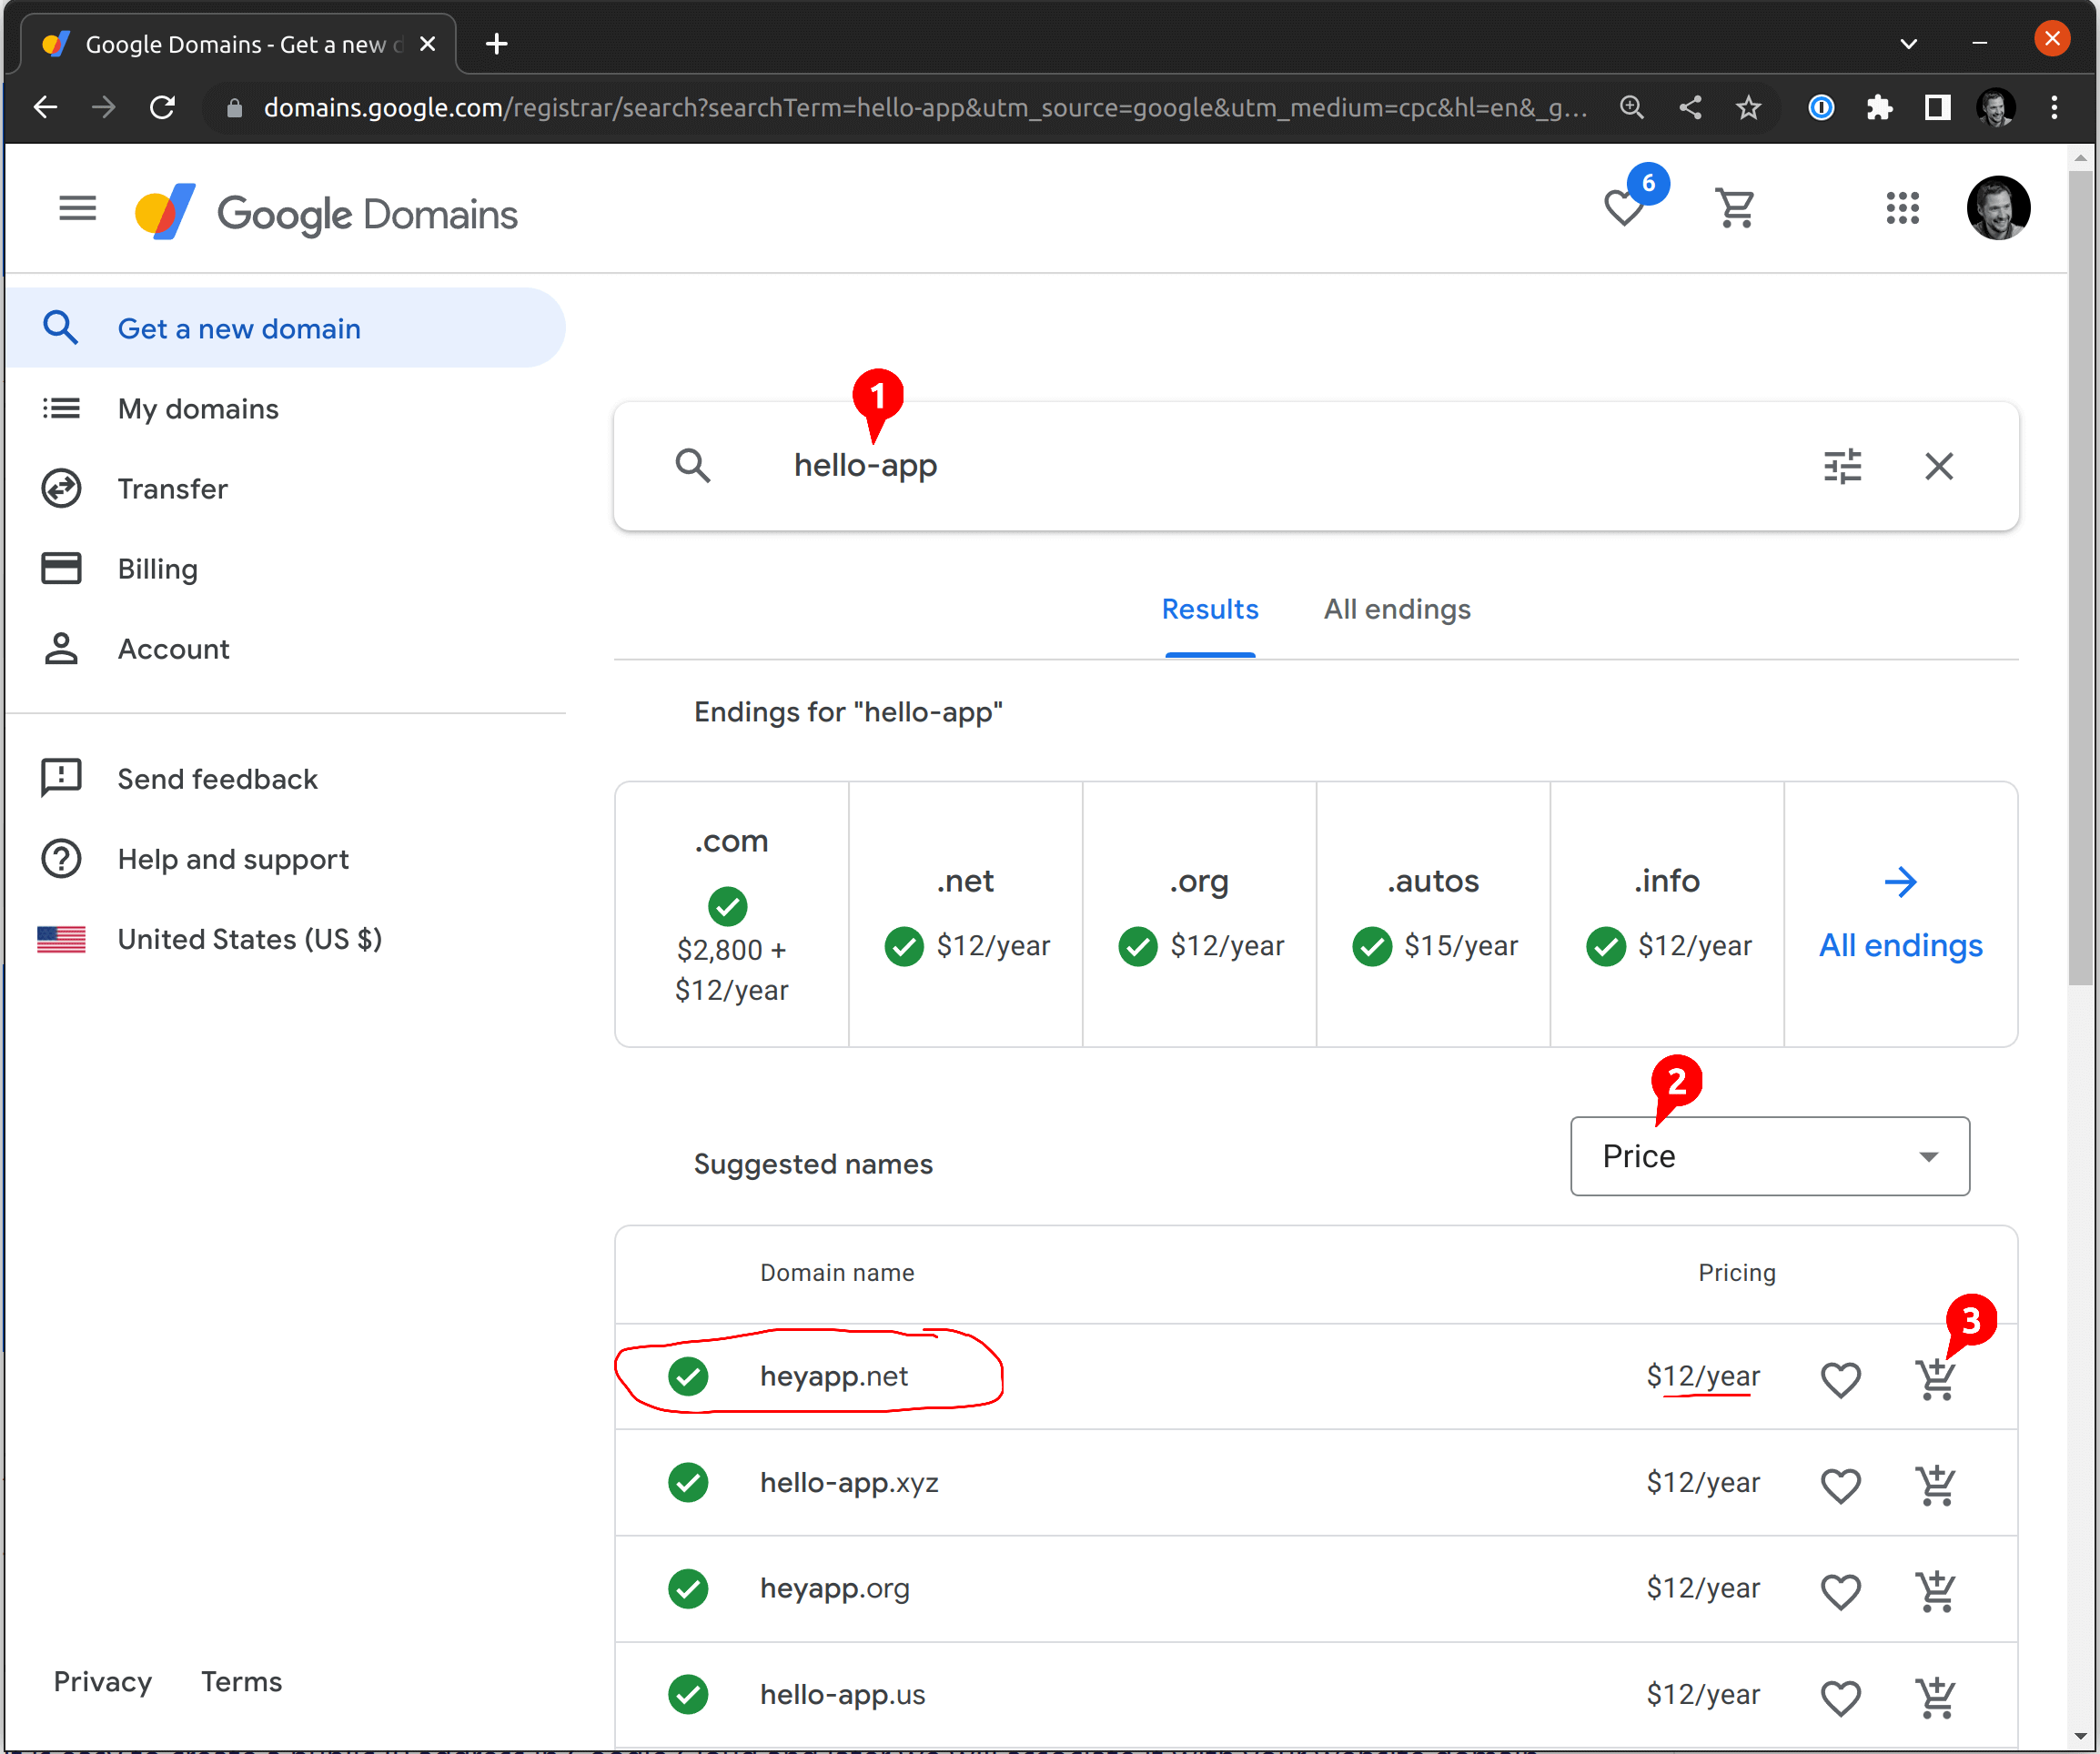
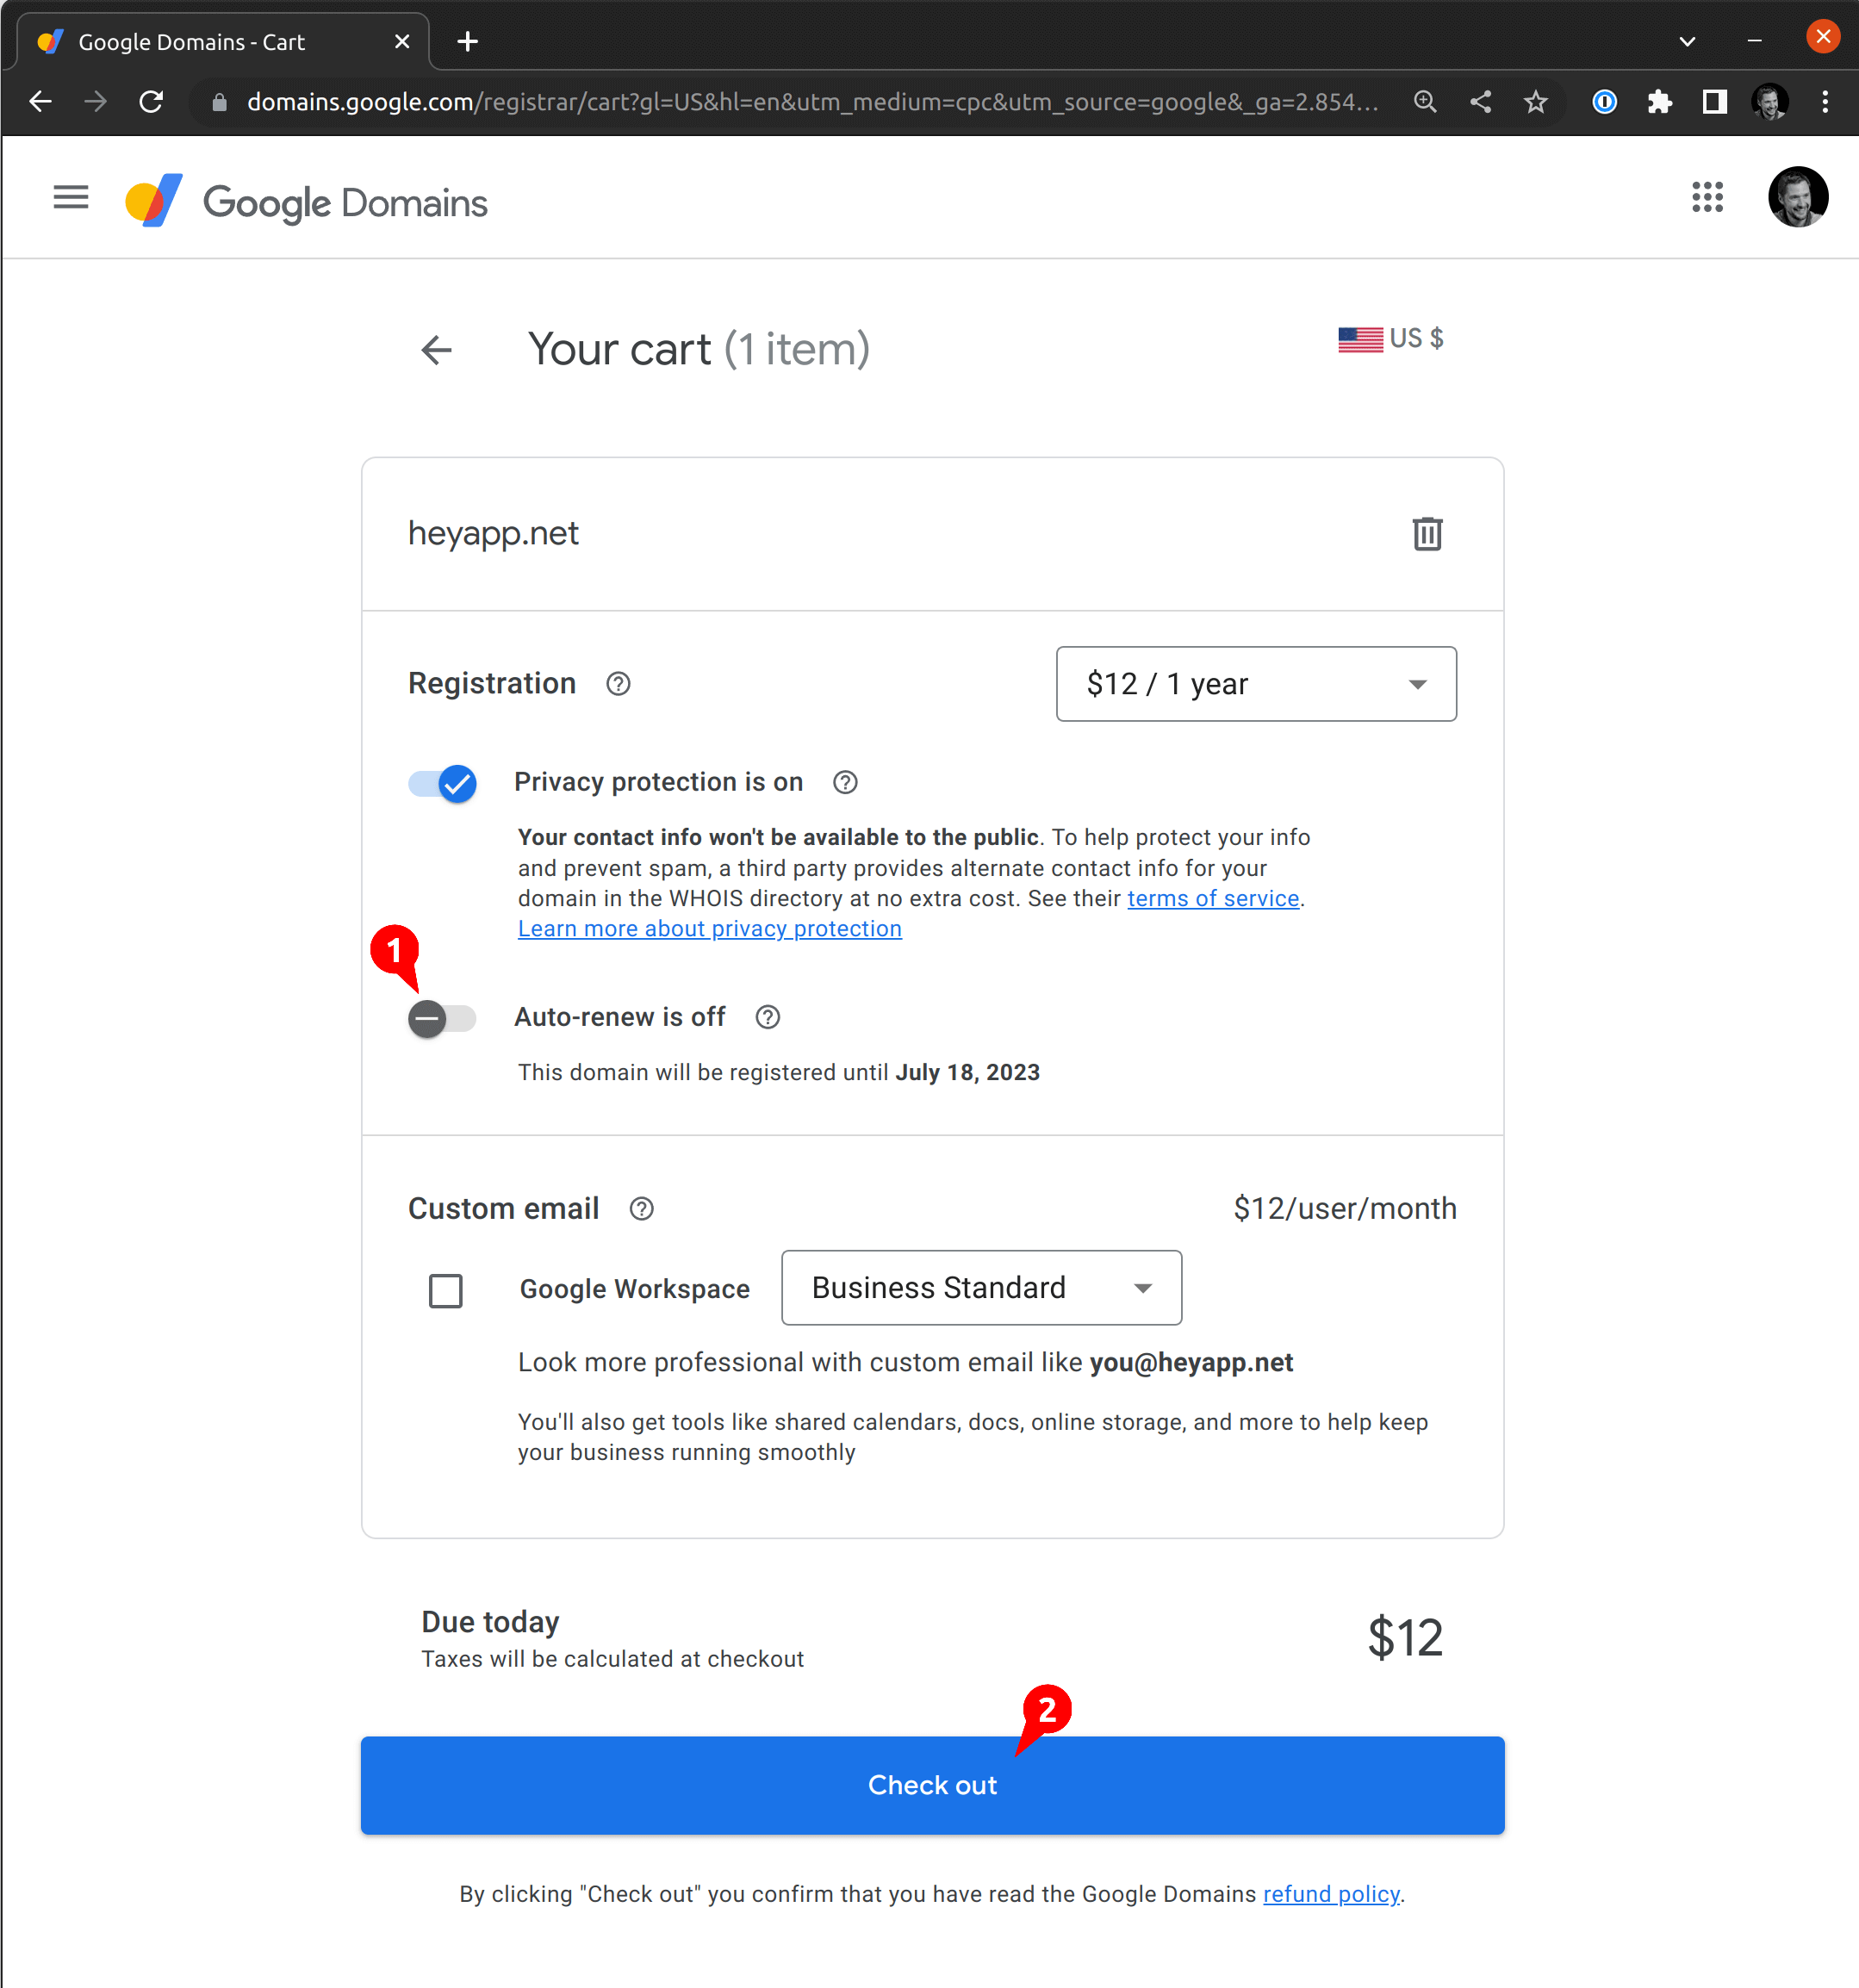
我們不會選擇 hello-app.com,因為它要價 2,800 美元;相反地,我們選擇最上面的那個: heyapp.net。看起來不錯!然後我們按一下購物車按鈕。在下一個畫面中,您將要停用自動續約,因為我們不想每年支付此網域的費用
現在您知道您的網域名稱了,請將其儲存在環境變數中
export DOMAIN_NAME=heyapp.net
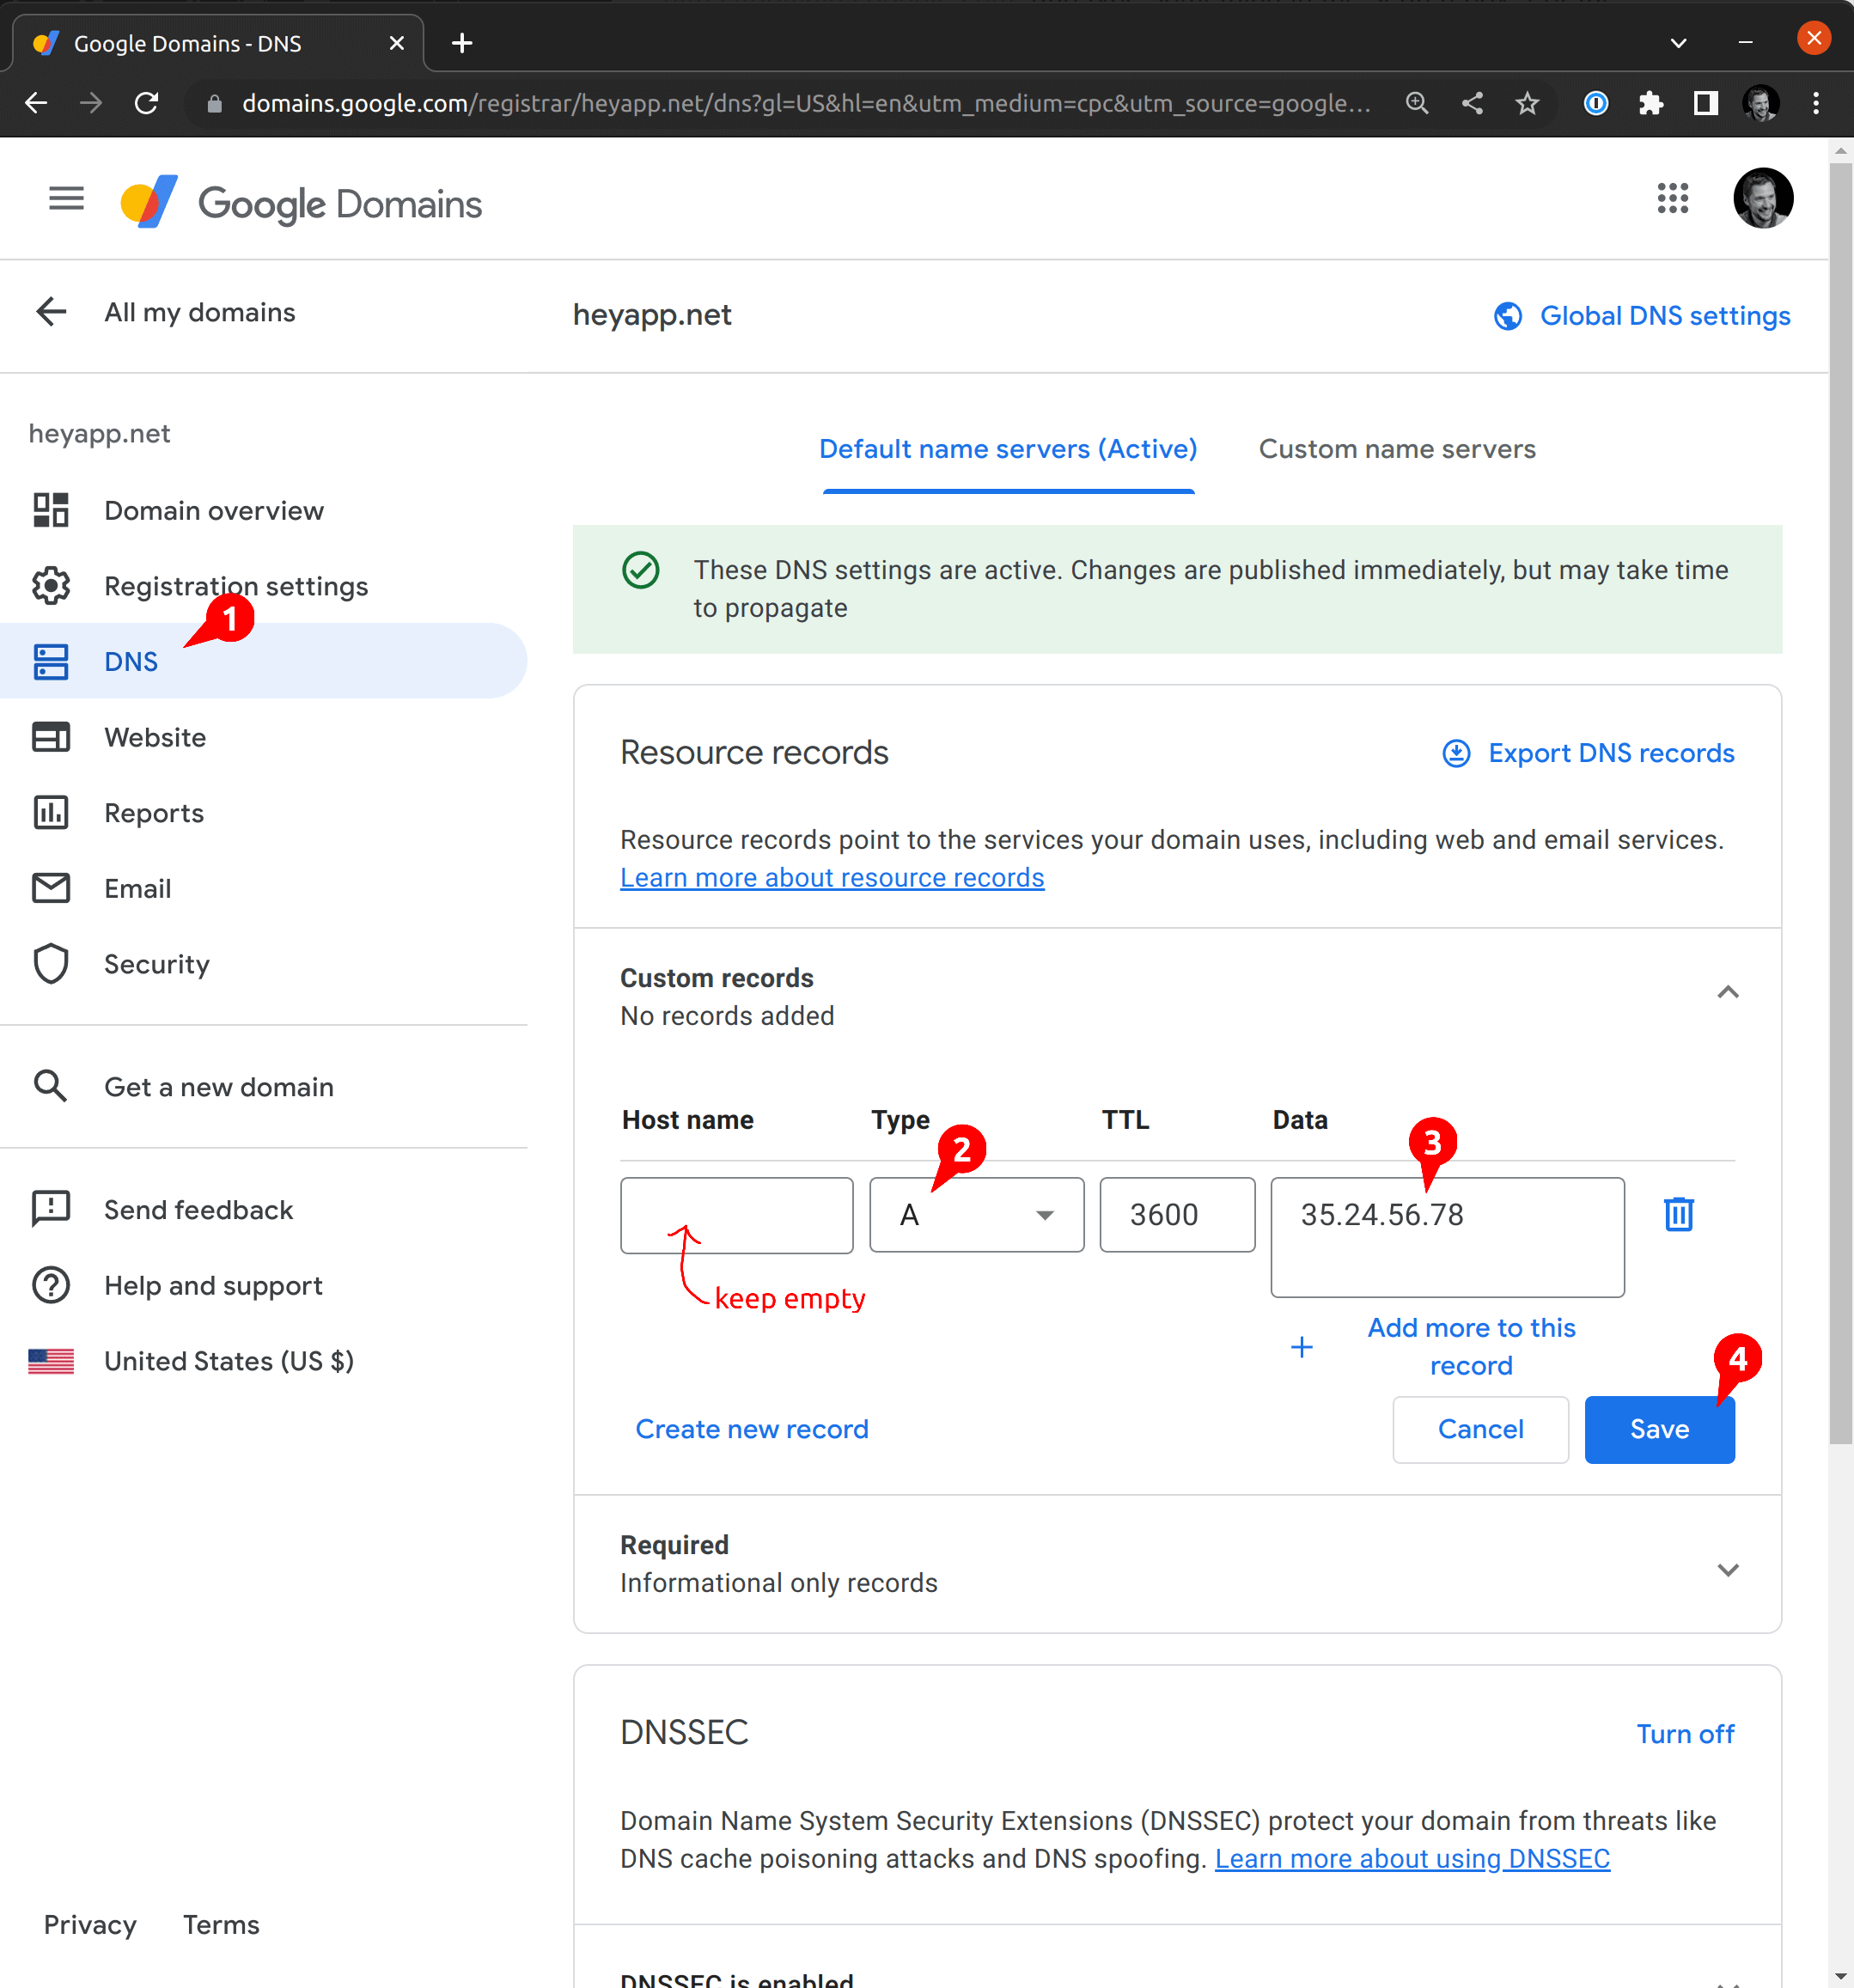
接下來,您需要建立一個新的 A 記錄,指向我們上面建立的 IP 位址。回到 https://domains.google.com/registrar,開啟您的網域(這裡為 heyapp.net),然後點擊左側選單的「DNS」。您會看到「自訂記錄」。您需要新增一個類型為 A 的新記錄,並將上一步驟的 IP 位址放入「資料」中。您必須將「主機名稱」保留為空白,因為我們要設定頂層網域名稱。
🔰 深入了解 Cloudflare DNS 教學中的 DNS A 記錄是什麼?。
ℹ️ 為您的網站建立網域名稱並非絕對必要。您可以使用 IP 位址連線到網站,稍後您可以為 IP 位址建立 SSL 憑證,而非網域名稱。如果因為某些原因無法建立網域名稱,請隨意跳過此章節,並調整以下說明以改用 IP 位址。
ℹ️ 每個 Google Cloud 位址都有自動產生的反向 DNS 名稱,例如
51.159.120.34.bc.googleusercontent.com,但是父網域googleusercontent.com有一個 CAA 記錄,會阻止 Let's Encrypt 為子網域簽署憑證。請參閱 Let's Encrypt 文件中的 憑證授權機構授權 (CAA)。
5. 建立 Ingress
您還無法連線到您的網站。您的網路伺服器正在您的 Kubernetes 叢集中執行,但目前還沒有任何路由或 Proxy 可以讓網際網路用戶端連線到它!現在我們將建立一個 Kubernetes Ingress 物件,在 Google Cloud 中,這會觸發建立各種服務,讓網際網路用戶端可以連線到您在 Kubernetes 叢集中執行的網路伺服器。
一開始,我們要建立一個 HTTP (而非 HTTPS) Ingress,以便我們在新增 SSL 層之前測試基本連線能力。
將以下 YAML 複製到名為 ingress.yaml 的檔案中,並套用它。
# ingress.yamlapiVersion: networking.k8s.io/v1kind: Ingressmetadata:name: web-ingressannotations:# This tells Google Cloud to create an External Load Balancer to realize this Ingresskubernetes.io/ingress.class: gce# This enables HTTP connections from Internet clientskubernetes.io/ingress.allow-http: "true"# This tells Google Cloud to associate the External Load Balancer with the static IP which we created earlierkubernetes.io/ingress.global-static-ip-name: web-ipspec:defaultBackend:service:name: webport:number: 8080
kubectl apply -f ingress.yaml
這會觸發建立一個與您先前建立的 IP 位址相關聯的 Google HTTP(S) 負載平衡器。您可以觀察進度以及正在建立的資源。
kubectl describe ingress web-ingress
在 4-5 分鐘內,所有負載平衡器元件都應該準備就緒,而且您應該能夠連線到 DNS 名稱,並看到我們稍早部署的 hello-world 網路伺服器傳回的回應。
curl http://$DOMAIN_NAME
範例輸出
Hello, world!Version: 1.0.0Hostname: web-79d88c97d6-t8hj2
此時,我們有一個 Google 負載平衡器,它會將 HTTP 流量轉送到我們叢集中 Pod 執行的 hello-world 網路伺服器。
⏲ 負載平衡器元件可能需要 4-5 分鐘才能建立和設定完成,並且讓網際網路用戶端可以路由到您的網路伺服器。如果花費的時間較長,請參閱疑難排解章節。
🔰 了解如何透過 Ingress 註解使用 HTTP(S) 負載平衡器的靜態 IP 位址。
🔰 閱讀 GKE 的外部 Ingress 註解摘要。
🔰 閱讀 在 GKE 上使用外部 HTTP(S) 負載平衡進行 Ingress 疑難排解。
ℹ️ GKE Ingress 有兩種可用的 Ingress 類別。
gce類別會部署外部負載平衡器,而gce-internal類別會部署內部負載平衡器。未指定類別的 Ingress 資源預設為gce。⚠️ 與 Kubernetes Ingress 文件相反,您必須使用
kubernetes.io/ingress.class註解,而非Ingress.Spec.IngressClassName欄位。請參閱 ingress-gce #1301 和 ingress-gce #1337。
6. 安裝 cert-manager
最後,我們準備好開始為我們的網站建立 SSL 憑證。您需要做的第一件事是安裝 cert-manager,我們會使用 kubectl 輕鬆地安裝它,如下所示
kubectl apply -f https://github.com/cert-manager/cert-manager/releases/download/v1.16.1/cert-manager.yaml
這會在名為 cert-manager 的新命名空間中建立三個部署,以及一堆服務和 Pod。它還會安裝各種叢集範圍的支援資源,例如 RBAC 角色和自訂資源定義。
您可以檢視一些已安裝的資源,如下所示
kubectl -n cert-manager get all
您可以使用 kubectl explain 來探索自訂資源定義 (cert-manager 的 API),如下所示
kubectl explain Certificatekubectl explain CertificateRequestkubectl explain Issuer
🔰 閱讀有關其他安裝 cert-manager 的方法。
🔰 深入了解憑證和簽發者。
7. 為 Let's Encrypt 預備環境建立簽發者
簽發者是一種自訂資源,它會告訴 cert-manager 如何簽署憑證。在此案例中,簽發者將設定為連線到 Let's Encrypt 預備伺服器,這讓我們能夠在不使用完網域名稱的 Let's Encrypt 憑證配額的情況下測試所有內容。
ℹ️ Let's Encrypt 使用自動憑證管理環境 (ACME) 協定,這就是為什麼以下設定在名為
acme的金鑰下。
將以下內容儲存到名為 issuer-lets-encrypt-staging.yaml 的檔案中,將 email 欄位變更為使用您的電子郵件地址並套用它。
# issuer-lets-encrypt-staging.yamlapiVersion: cert-manager.io/v1kind: Issuermetadata:name: letsencrypt-stagingspec:acme:server: https://acme-staging-v02.api.letsencrypt.org/directoryemail: <email-address> # ❗ Replace this with your email addressprivateKeySecretRef:name: letsencrypt-stagingsolvers:- http01:ingress:name: web-ingress
kubectl apply -f issuer-lets-encrypt-staging.yaml
ℹ️ 電子郵件地址僅由 Let's Encrypt 用於提醒您在過期前 30 天續訂憑證。只有在 cert-manager 續訂憑證時發生問題,您才會收到此電子郵件。
您可以檢查簽發者的狀態
kubectl describe issuers.cert-manager.io letsencrypt-staging
範例輸出
Status:Acme:Last Registered Email: firstname.lastname@example.comUri: https://acme-staging-v02.api.letsencrypt.org/acme/acct/60706744Conditions:Last Transition Time: 2022-07-13T16:13:25ZMessage: The ACME account was registered with the ACME serverObserved Generation: 1Reason: ACMEAccountRegisteredStatus: TrueType: Ready
ℹ️ Let's Encrypt 生產環境簽發者有非常嚴格的速率限制。當您在實驗和學習時,很容易就會達到這些限制。由於這種風險,我們會從 Let's Encrypt 預備簽發者開始,一旦我們確定它運作正常,就會切換到生產環境簽發者。
⚠️ 在下一步中,您會看到關於不信任憑證的警告,因為我們從預備簽發者開始,但這是完全預期的。
🔰 深入了解設定 ACME 簽發者。
8. 重新設定 Ingress 以使用 SSL
稍早我們建立了一個 Ingress,並看到我們可以使用 HTTP 連線到我們的網路伺服器。現在,我們要重新設定該 Ingress 以使用 HTTPS。
首先,針對 Google Cloud Ingress 控制器問題的快速解決方法。在重新設定 Ingress 之前,為您的 SSL 憑證建立一個空的密碼,並套用它。
# secret.yamlapiVersion: v1kind: Secretmetadata:name: web-ssltype: kubernetes.io/tlsstringData:tls.key: ""tls.crt: ""
kubectl apply -f secret.yaml
ℹ️ 這是為了避開先有雞還是先有蛋的問題,ingress-gce 控制器除非先找到最終會包含 SSL 憑證的密碼,否則不會更新其轉送規則。但 Let's Encrypt 除非能夠取得 cert-manager 新增至 Ingress 的特殊
.../.well-known/acme-challenge/...URL,否則不會簽署 SSL 憑證,而該 URL 必須由 ingress-gce 控制器轉換為 Google Cloud 轉送規則。🔰 深入了解Kubernetes 密碼以及如何使用它們。
現在對 Ingress 進行以下變更並套用它們
--- a/ingress.yaml+++ b/ingress.yaml@@ -7,7 +7,12 @@ metadata:kubernetes.io/ingress.class: gcekubernetes.io/ingress.allow-http: "true"kubernetes.io/ingress.global-static-ip-name: web-ip+ cert-manager.io/issuer: letsencrypt-stagingspec:+ tls:+ - secretName: web-ssl+ hosts:+ - $DOMAIN_NAMEdefaultBackend:service:name: web
kubectl apply -f ingress.yaml
這會觸發一系列複雜的操作,可能需要許多分鐘才能最終完成。其中一些步驟需要 2-3 分鐘,而有些步驟一開始會失敗。它們最終都應該會成功,因為 cert-manager 和 ingress-gce (Google Cloud Ingress 控制器) 會定期重新協調。
最後,當所有元件都就緒時,您應該可以使用 curl 來檢查與您網站的 HTTPS 連線
curl -v --insecure https://$DOMAIN_NAME
您應該會看到已建立 HTTPS 連線,但 SSL 憑證不受信任;這就是為什麼您在此階段使用 --insecure 旗標的原因
範例輸出
* Server certificate:* subject: CN=www.example.com* start date: Jul 14 08:52:29 2022 GMT* expire date: Oct 12 08:52:28 2022 GMT* issuer: C=US; O=(STAGING) Let's Encrypt; CN=(STAGING) Artificial Apricot R3* SSL certificate verify result: unable to get local issuer certificate (20), continuing anyway.
⏲ 您必須等待 5-10 分鐘,SSL 憑證才能被簽署,然後由 Google Cloud 負載平衡器載入。如果花費的時間較長,請參閱疑難排解章節。
ℹ️ 新增註解
cert-manager.io/issuer: letsencrypt-staging會標記 Ingress 以引起 cert-manageringress-shim的注意,並導致它建立一個新的憑證,其中包含對我們先前建立之簽發者的參考。🔰 閱讀保護 Ingress 資源以深入了解。
🔰 了解如何在 GKE 中為您的 Ingress 指定憑證。
9. 建立生產環境就緒的 SSL 憑證
現在一切都使用 Let's Encrypt 預備伺服器運作正常,我們可以切換到生產伺服器並取得受信任的 SSL 憑證。
建立 Let's Encrypt 生產環境簽發者並套用它
# issuer-lets-encrypt-production.yamlapiVersion: cert-manager.io/v1kind: Issuermetadata:name: letsencrypt-productionspec:acme:server: https://acme-v02.api.letsencrypt.org/directoryemail: <email-address> # ❗ Replace this with your email addressprivateKeySecretRef:name: letsencrypt-productionsolvers:- http01:ingress:name: web-ingress
kubectl apply -f issuer-lets-encrypt-production.yaml
接著更新 Ingress 注釋,以使用正式環境的發行者。
kubectl annotate ingress web-ingress cert-manager.io/issuer=letsencrypt-production --overwrite
這會觸發 cert-manager 取得由 Let's Encrypt 正式 CA 簽署的新 SSL 憑證,並將其儲存到 web-ssl Secret 中。大約 10 分鐘內,這個新憑證將會同步到 Google Cloud 負載平衡器,屆時您就可以使用安全的 HTTPS 連線到網站。
curl -v https://$DOMAIN_NAME
範例輸出
...* Server certificate:* subject: CN=www.example.com* start date: Jul 14 09:44:29 2022 GMT* expire date: Oct 12 09:44:28 2022 GMT* subjectAltName: host "www.example.com" matched cert's "www.example.com"* issuer: C=US; O=Let's Encrypt; CN=R3* SSL certificate verify ok....Hello, world!Version: 1.0.0Hostname: web-79d88c97d6-t8hj2
您應該也可以在網頁瀏覽器中瀏覽 https://$DOMAIN_NAME,而不會出現任何錯誤或警告。
本教學到此結束。您現在了解 cert-manager 如何與 Kubernetes Ingress 和雲端 Ingress 控制器整合。您已學會如何使用 cert-manager 取得免費的 Let's Encrypt SSL 憑證。並且您也了解雲端負載平衡器如何使用這些憑證來終止來自網際網路用戶端的 SSL 連線,並將 HTTPS 請求轉發到 Kubernetes 叢集中執行的網頁伺服器。
💵 請閱讀清理章節,以了解如何刪除在本教學中建立的所有資源,並減少您的雲端費用。
🔰 如果您在執行本教學中的步驟時遇到困難,請閱讀疑難排解章節。
清理
完成本教學後,您可以透過刪除叢集、網域名稱和靜態 IP 來進行清理,如下所示
# Delete the cluster and all the Google Cloud resources related to the Ingress that it containsgcloud container clusters delete $CLUSTER# Delete the domain namegcloud dns record-sets delete $DOMAIN_NAME --zone $ZONE --type A# Delete the static IP addressgcloud compute addresses delete web-ip --global
疑難排解
當您在本教學中建立或更新 Ingress 物件時,會觸發一連串複雜的操作,可能需要數分鐘才能最終完成。其中一些步驟需要 2-3 分鐘,有些步驟最初會失敗,但隨後會在 cert-manager 或 Google Ingress 控制器重新協調時成功。簡而言之,您應該在建立或變更 Ingress 後等待 5-10 分鐘,並且在執行 kubectl describe ingress web-ingress 時,應該會看到一些錯誤和警告。
以下是 cert-manager 和 ingress-gce (Google Cloud Ingress 控制器) 執行的操作的簡短摘要
- cert-manager 連接到 Let's Encrypt 並傳送 SSL 憑證簽署請求。
- Let's Encrypt 回應一個「挑戰」,這是一個獨特的權杖,cert-manager 必須在目標網站上的已知位置提供。這證明您是該網站和網域名稱的管理員。
- cert-manager 部署一個 Pod,其中包含一個臨時網頁伺服器,用於提供 Let's Encrypt 挑戰權杖。
- cert-manager 重新設定 Ingress,新增一個
rule,將來自 Let's Encrypt 的請求路由到該臨時網頁伺服器。 - Google Cloud Ingress 控制器使用該新規則重新設定外部 HTTP 負載平衡器。
- Let's Encrypt 現在連線並接收預期的挑戰權杖,並簽署 SSL 憑證並將其返回給 cert-manager。
- cert-manager 將簽署的 SSL 憑證儲存在名為
web-ssl的 Kubernetes Secret 中。 - Google Cloud Ingress 控制器將簽署的憑證和相關的私鑰上傳到 Google Cloud 憑證。
- Google Cloud Ingress 控制器重新設定外部負載平衡器以提供上傳的 SSL 憑證。
檢查 Ingress 和相關事件
使用 kubectl describe 檢視 Ingress 設定和所有相關的事件。檢查 IP 位址是否正確,以及 TLS 和 Host 項目是否與您為網站選擇的網域名稱相符。請注意,ingress-gce 會為其管理的每個 Google Cloud 組件建立一個事件。並請注意,它會新增註釋,其中包含對每個組件 ID 的參考。cert-manager 也會在協調 Ingress 物件時建立事件,包括它為 Ingress 建立的憑證物件的詳細資訊。
$ kubectl describe ingress web-ingressName: web-ingressLabels: <none>Namespace: defaultAddress: 34.120.159.51Ingress Class: <none>Default backend: web:8080 (10.52.0.13:8080)TLS:web-ssl terminates www.example.comRules:Host Path Backends---- ---- --------* * web:8080 (10.52.0.13:8080)Annotations: cert-manager.io/issuer: letsencrypt-stagingingress.kubernetes.io/backends: {"k8s1-01784147-default-web-8080-1647ccd2":"HEALTHY"}ingress.kubernetes.io/forwarding-rule: k8s2-fr-1lt9dzcy-default-web-ingress-yteotwe4ingress.kubernetes.io/https-forwarding-rule: k8s2-fs-1lt9dzcy-default-web-ingress-yteotwe4ingress.kubernetes.io/https-target-proxy: k8s2-ts-1lt9dzcy-default-web-ingress-yteotwe4ingress.kubernetes.io/ssl-cert: k8s2-cr-1lt9dzcy-4gjeakdb9n7k6ls7-a257650b5fefd174ingress.kubernetes.io/target-proxy: k8s2-tp-1lt9dzcy-default-web-ingress-yteotwe4ingress.kubernetes.io/url-map: k8s2-um-1lt9dzcy-default-web-ingress-yteotwe4kubernetes.io/ingress.allow-http: truekubernetes.io/ingress.class: gcekubernetes.io/ingress.global-static-ip-name: web-ipEvents:Type Reason Age From Message---- ------ ---- ---- -------Normal CreateCertificate 28m cert-manager-ingress-shim Successfully created Certificate "web-ssl"Normal Sync 28m loadbalancer-controller UrlMap "k8s2-um-1lt9dzcy-default-web-ingress-yteotwe4" updatedWarning Sync 24m (x16 over 28m) loadbalancer-controller Error syncing to GCP: error running load balancer syncing routine: loadbalancer 1lt9dzcy-default-web-ingress-yteotwe4 does not exist: googleapi: Error 404: The resource 'projects/your-project/global/sslCertificates/k8s2-cr-1lt9dzcy-4gjeakdb9n7k6ls7-e3b0c44298fc1c14' was not found, notFoundNormal Sync 34s (x16 over 65m) loadbalancer-controller Scheduled for sync
使用 cmctl 顯示憑證及其相關資源的狀態
ℹ️ 如果您尚未安裝,請安裝
cmctl。
當您建立憑證時,cert-manager 會建立一組臨時資源,每個資源都包含有關憑證簽署過程狀態的資訊。您可以在憑證生命週期章節中閱讀更多相關資訊。使用 cmctl status 命令檢視所有這些資源的詳細資訊,以及所有相關的事件和錯誤訊息。
您可能會看到一些暫時性的錯誤,例如
$ cmctl status certificate web-sslName: web-sslNamespace: defaultCreated at: 2022-07-14T17:30:06+01:00Conditions:Ready: False, Reason: MissingData, Message: Issuing certificate as Secret does not contain a private keyIssuing: True, Reason: MissingData, Message: Issuing certificate as Secret does not contain a private keyDNS Names:- www.example.comEvents:Type Reason Age From Message---- ------ ---- ---- -------Normal Issuing 4m37s cert-manager-certificates-trigger Issuing certificate as Secret does not contain a private keyNormal Generated 4m37s cert-manager-certificates-key-manager Stored new private key in temporary Secret resource "web-ssl-8gsqc"Normal Requested 4m37s cert-manager-certificates-request-manager Created new CertificateRequest resource "web-ssl-dblrj"Issuer:Name: letsencrypt-stagingKind: IssuerConditions:Ready: True, Reason: ACMEAccountRegistered, Message: The ACME account was registered with the ACME serverEvents: <none>error: 'tls.crt' of Secret "web-ssl" is not setNot Before: <none>Not After: <none>Renewal Time: <none>CertificateRequest:Name: web-ssl-dblrjNamespace: defaultConditions:Approved: True, Reason: cert-manager.io, Message: Certificate request has been approved by cert-manager.ioReady: False, Reason: Pending, Message: Waiting on certificate issuance from order default/web-ssl-dblrj-327645514: "pending"Events:Type Reason Age From Message---- ------ ---- ---- -------Normal cert-manager.io 4m37s cert-manager-certificaterequests-approver Certificate request has been approved by cert-manager.ioNormal OrderCreated 4m37s cert-manager-certificaterequests-issuer-acme Created Order resource default/web-ssl-dblrj-327645514Normal OrderPending 4m37s cert-manager-certificaterequests-issuer-acme Waiting on certificate issuance from order default/web-ssl-dblrj-327645514: ""Order:Name: web-ssl-dblrj-327645514State: pending, Reason:Authorizations:URL: https://acme-staging-v02.api.letsencrypt.org/acme/authz-v3/3008789144, Identifier: www.example.com, Initial State: pending, Wildcard: falseChallenges:- Name: web-ssl-dblrj-327645514-2671694319, Type: HTTP-01, Token: TKspp86xMjQzTvMVXWkezEA2sE2GSWjnld5Lt4X13ro, Key: TKspp86xMjQzTvMVXWkezEA2sE2GSWjnld5Lt4X13ro.f4bppCOm-jXasFGMKjpBE5aQlhiQBeTPIs0Lx822xao, State: pending, Reason: Waiting for HTTP-01 challenge propagation: did not get expected response when querying endpoint, expected "TKspp86xMjQzTvMVXWkezEA2sE2GSWjnld5Lt4X13ro.f4bppCOm-jXasFGMKjpBE5aQlhiQBeTPIs0Lx822xao" but got: Hello, world!Version: 1... (truncated), Processing: true, Presented: true
這是因為 cert-manager 正在執行預檢,以查看是否可以在預期的 URL 上連線到臨時挑戰網頁伺服器。一開始無法連線,因為 cert-manager 需要一些時間來部署臨時網頁伺服器,而 Ingress 控制器需要時間來設定新的 HTTP 路由規則。最終您會看到憑證已就緒並已簽署。
$ cmctl status certificate web-sslName: web-sslNamespace: defaultCreated at: 2022-07-14T17:30:06+01:00Conditions:Ready: True, Reason: Ready, Message: Certificate is up to date and has not expiredDNS Names:- www.example.comEvents:Type Reason Age From Message---- ------ ---- ---- -------Normal Issuing 31m cert-manager-certificates-trigger Issuing certificate as Secret does not contain a private keyNormal Generated 31m cert-manager-certificates-key-manager Stored new private key in temporary Secret resource "web-ssl-8gsqc"Normal Requested 31m cert-manager-certificates-request-manager Created new CertificateRequest resource "web-ssl-dblrj"Normal Issuing 26m cert-manager-certificates-issuing The certificate has been successfully issuedIssuer:Name: letsencrypt-stagingKind: IssuerConditions:Ready: True, Reason: ACMEAccountRegistered, Message: The ACME account was registered with the ACME serverEvents: <none>Secret:Name: web-sslIssuer Country: USIssuer Organisation: (STAGING) Let's EncryptIssuer Common Name: (STAGING) Artificial Apricot R3Key Usage: Digital Signature, Key EnciphermentExtended Key Usages: Server Authentication, Client AuthenticationPublic Key Algorithm: RSASignature Algorithm: SHA256-RSASubject Key ID: a51e3621f5c1138947810f27dce425b33c88cb16Authority Key ID: de727a48df31c3a650df9f8523df57374b5d2e65Serial Number: fa8bb0b603ca2cdbfdfb2872d05ee52cda10Events: <none>Not Before: 2022-07-14T16:34:52+01:00Not After: 2022-10-12T16:34:51+01:00Renewal Time: 2022-09-12T16:34:51+01:00
檢查 SSL 憑證是否已複製到 Google Cloud
在 cert-manager 收到簽署的憑證後,會將其儲存在 web-ssl Secret 中,這反過來會觸發 Google Cloud Ingress 控制器將該 SSL 憑證複製到 Google Cloud。您可以使用 gcloud 命令查看憑證,如下所示
$ gcloud compute ssl-certificates listNAME TYPE CREATION_TIMESTAMP EXPIRE_TIME MANAGED_STATUSk8s2-cr-1lt9dzcy-4gjeakdb9n7k6ls7-a257650b5fefd174 SELF_MANAGED 2022-07-14T09:37:06.920-07:00 2022-10-12T08:34:51.000-07:00
並且您可以查看其內容並檢查其屬性,如下所示
$ gcloud compute ssl-certificates describe k8s2-cr-1lt9dzcy-4gjeakdb9n7k6ls7-a257650b5fefd174 --format='value(certificate)' \| openssl x509 -in - -noout -text...Certificate:Data:Version: 3 (0x2)Serial Number:04:9f:47:f1:cb:25:37:9b:86:a3:ef:bf:2e:77:3b:45:fc:1aSignature Algorithm: sha256WithRSAEncryptionIssuer: C = US, O = Let's Encrypt, CN = R3ValidityNot Before: Jul 14 17:11:15 2022 GMTNot After : Oct 12 17:11:14 2022 GMTSubject: CN = www.example.com
檢查 Google Cloud 轉發規則
在您將 TLS stanza 新增到 Ingress 物件後,您應該最終會看到 SSL 連線的轉發規則
$ gcloud compute forwarding-rules describe k8s2-fs-1lt9dzcy-default-web-ingress-yteotwe4 --globalIPAddress: 34.120.159.51IPProtocol: TCPcreationTimestamp: '2022-07-14T09:37:12.362-07:00'description: '{"kubernetes.io/ingress-name": "default/web-ingress"}'fingerprint: oBTg7dRaIqI=id: '2303318464959215831'kind: compute#forwardingRulelabelFingerprint: 42WmSpB8rSM=loadBalancingScheme: EXTERNALname: k8s2-fs-1lt9dzcy-default-web-ingress-yteotwe4networkTier: PREMIUMportRange: 443-443selfLink: https://www.googleapis.com/compute/v1/projects/your-project/global/forwardingRules/k8s2-fs-1lt9dzcy-default-web-ingress-yteotwe4target: https://www.googleapis.com/compute/v1/projects/your-project/global/targetHttpsProxies/k8s2-ts-1lt9dzcy-default-web-ingress-yteotwe4
